 IT Tutorial IT Tutorial | Oracle DBA | SQL Server, Goldengate, Exadata, Big Data, Data ScienceTutorial
Hi,
I will continue to tell Oracle database 18c step by step installation in this post.

Oracle 18c Installation
You should read first article before this article read.
Oracle Database 18c Step by Step Installation on Linux 7.6 and RHEL -1
Oracle Database 18c Installation
After the software installation, the database profile is set in linux. Because ASM and the database are two separate instances, they must have separate profile files. Because the database is used more often, DBAs often put profile information in the .bash_profile file. This file is automatically set when the oracle user is logged in. There is no need to set the file again.
The contents of the .bash_profile file on Linux are as follows.
[oracle@MehmetSalih ~]$ cat .bash_profile
# .bash_profile
# Get the aliases and functions
if [ -f ~/.bashrc ]; then
. ~/.bashrc
fi
# User specific environment and startup programs
PATH=$PATH:$HOME/.local/bin:$HOME/bin

export ORACLE_HOME=/u01/database
export ORACLE_BASE=/u01/app/oracle
export PATH=$ORACLE_HOME/bin:$ORACLE_HOME/OPatch:$PATH
export LD_LIBRARY_PATH=$ORACLE_HOME/lib:$ORACLE_HOME/lib32
export LIBPATH=$ORACLE_HOME/lib:$ORACLE_HOME/lib32
export ORACLE_SID=DEVECI18C
export NLS_LANG=AMERICAN_AMERICA.WE8ISO8859P9
export PATH
After the Oracle database environment has been set, the Database Configuration Assistant will be opened as follows when you open the vncserver with the oracle user and write the dbca from the terminal.
With this tool you can create, delete and configure databases.
In the first step, we will create a database and select create database and proceed next.

In this step, we select Advanced configuration instead of the typical configuration. So we’ve done all the settings ourselves.


This step is called Global database name and Oracle SID. I did not select the Container database option because we did not use Pluggable database.

If you don’t read Automatic Storage managent ( ASM ) installation before this article, you should read following articles. Because I have used Oracle database installation with ASM storage type. If you won’t choose ASM and will use File system type then you can ignore these steps.
Oracle Automatic Storage Management 18c Step by Step Installation -1
Oracle Automatic Storage Management 18c Step by Step Installation -2
Since I prefer Automatic Storage management for Oracle database 18c installation, I chose ASM and I chose + DATA which I created in the above article as a disk group.
In this step you can change and configure Redolog and controlfiles. When you choose Use Oracle-Managed Files (OMF), Oracle identifies the file names.
When installing Oracle 12c after the installation of Oracle 18c, I will make the installation with File system instead of ASM in order to see the file system except ASM.

Here, I selected the Fast Recovery Area (FRA) option and showed the ASM as the location. In the following sections, the logic of FRA and Archivelog will be explained.

In this step, the database in listener is determined. Since the listener was created in the ASM installation, we can select and continue this list in this step. If you want, you can create a new listener in this step.

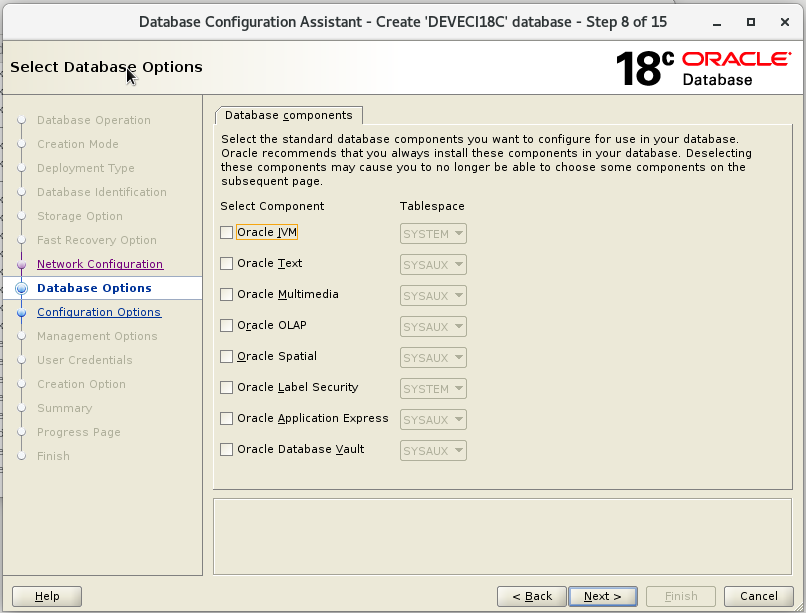
I see that all the components have been installed in the databases established in many institutions without any license, maybe because they need. In terms of this license, too many incorrect policies mean redundancy in terms of database management.

In this step, the database in Block is determined. As stated in the warning, Block is one of the parameters that will not change after the database is created. So you have to be careful in determining. In OLTP systems, which we call Online Transaction Process in general, it is given as block size 8K.
In the Datawarehouse and reporting databases, which we call OLAP (online analytical processing), this value is usually specified as 16K or 32K.
The number of database processes should also be determined carefully. This parameter can be changed if it is not enough later but it is a parameter that requires restart.

This step sets the Database Character set. The character is also a critical parameter for the database setup because it is one of the unchanging properties after installation. In live database or production environments, these features should be determined according to the compatibility of software with software teams and which character is compatible with the set.

In this step, the way clients connect to the database are determined. In general, Dedicated server mode is used.


You can configure Enterprise Manager, which monitors and manages the monitoring and management of Oracle products in this step.

The password of the most important admin users of the Oracle database, such as Sys and system, is determined at this step.


Pre-database installation summary is provided. we start the installation by clicking Finish button.


You can connect to database via sqlplus like following.

You can check listener status with lsnrctl status command like following.

Do you want to learn Oracle database 19c Installation, then read the following articles.
Oracle Database 19c on Linux 7.6 Step by Step Installation -2
Magnificent site. Lots of useful info here. I’m sending it to several friends ans also sharing in delicious. And obviously, thanks for your effort!
As a Newbie, I am continuously exploring online for articles that can aid me. Thank you