 IT Tutorial IT Tutorial | Oracle DBA | SQL Server, Goldengate, Exadata, Big Data, Data ScienceTutorial
Hi guys in this tutorial We will see the custom listview.
In my previous tutorial, I talked about the use of adapters in android programming. If you have not read it yet, I recommend you read it first.
Android Programming -12 ArrayAdapter
In standard adapter use, we could not interfere with listview items in any way. But if we define our own adapter, we know that the listview implements the design we want.
Think about it, you are looking for hotels for a holiday. Each hotel should have small photo, name, addres how many stars, etc. Because of we will show all hotels, we need to use listview component. Since we want to show more than one feature of each hotel in one line, we need to customize our adapter.
when we want to customize the our adapter, we need to create a java class, a layout and a java adapter class. we code layout as we want a line of listview to be.
<?xml version="1.0" encoding="utf-8"?>

<LinearLayout xmlns:android="http://schemas.android.com/apk/res/android"

    android:orientation="vertical"

    android:layout_width="match_parent"

    android:layout_height="match_parent"

    android:layout_margin="20dp">

<LinearLayout

        android:layout_width="match_parent"

        android:layout_height="wrap_content"

        android:orientation="vertical"

        android:id="@+id/linearLayout">

<ImageView

            android:id="@+id/txt"

            android:layout_width="match_parent"

            android:layout_height="230dp"

            android:src="@drawable/siyah_ev"

            android:layout_margin="20dp" />

<LinearLayout

            android:layout_width="match_parent"

            android:layout_height="wrap_content"

            android:orientation="horizontal">

<TextView

                android:id="@+id/yorum"

                android:layout_width="200dp"

                android:layout_height="40dp"

                android:layout_marginLeft="20dp"

                android:text="Kübra Hebesss"

                android:textColor="#111"

                android:layout_marginTop="10dp"

                android:fontFamily="@string/confirm_recovery_body"

                android:textSize="15dp" />

<Button

                android:id="@+id/like"

                android:layout_width="30dp"

                android:layout_height="30dp"

                android:layout_marginLeft="50dp"

                android:layout_marginTop="15dp"

                android:background="@drawable/like_white" />

<TextView

                android:id="@+id/like_count"

                android:layout_width="30dp"

                android:text="12"

                android:textColor="#111"

                android:layout_height="35dp"

                android:layout_marginLeft="10dp"

                android:layout_marginTop="14dp"/>

        </LinearLayout>

        </LinearLayout>

</LinearLayout>
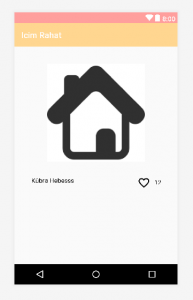
The output of our sample layout code is as above.
You can think of this page as the main screen of instagram . we add an imageview to our picture to show the picture we will share. Below the photo, we use a textview to see the name of the sharer, a button for followers to know like, and a textview showing the number of likes. We set the margin and padding features to the necessary components so that we can make the design as we want.