
Hi,
I will continue to explain how to install Oracle Database 12c step by step in this post.

Read previous articles before this post.
Step 21: Once Listener is set up, we can now create the database. In order to create our database, run the DBCA tool (Database Configuration Assistant) command that comes with the software installation as follows.
[oracle@MehmetSalih ~]# dbca
Step 22: In this step, choose the Create Database tab and continue.

Step 23: In this step, choose the Advanced Mode tab to create the database with our own configuration and not with the default configuration.

Step 24: In this step, choose the Custom database tab and create database as to our settings.

Step 25: In this step, type the name of our database as follows and continue.

Step 25: Skip Enterprise manager and Cloud control, if you want, you can choose them also.

Step 27: In the following step, the passwords of the most authorized users are determined. To use the same passwords within the two users, choose the following tab and enter the password.

Step 28: Choose the listener that we created in the previous article.

Step 29: In this step, Specify type of storage where the database’s Datafiles will be located. Select the Storage type as File System and select the same directory for all datafiles. In the meantime, because I did not select the Fast Recovery Area in the initial setup, I am going to uncheck the checkbox.

Step 30: In this step, choose the required components for the database and select the components that we need

Step 31: In this step, Oracle asks us to create sample schemas, and I have chosen the Sample Schemas tab.

Step 32: In this step, specify the total memory size for Oracle database . the optimal value is 40% of the server memory, but you can increase this value according to your needs.
You can choose the checkbox that specifies the Use Automatic Memory Management option for Oracle to use Automatic Memory management. Oracle will automatically manage the SGA and PGA memory areas if you choose this.

Step 33: In this step, set the Block Size value for Database. In general, this value is selected as 8192 Bytes or 8K. The number of processes to allocate on the server for the database can also be determined in this step.

Step 34: In this step, the character set to use the database is chosen like following.

Step 35: In this step, select the mode of the session that will be connected to the database as Dedicated.

Step 36: In this step, if you want to change the Storage, you can click the Customize Storage Locations button.

37.Step: In this step, database’s configurations are summarized, click Finish button to complete the database creation.

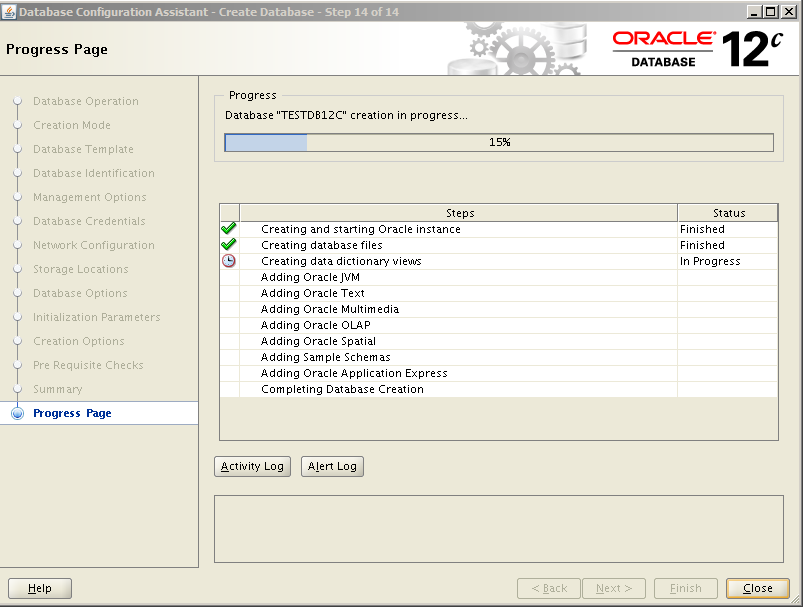
Step 38: The database is creating as follows.
Step 39: Database creation was completed as follows.

After the database is created, we are connecting to the database as follows and query the version.
[oracle@MehmetSalih ~]# sqlplus / as sysdba

SQL*Plus: Release 12.1.0.2.0 Production on Sat Oct 5 13:40:49 2013

Copyright (c) 1982, 2013, Oracle.  All rights reserved.

Connected to:
Oracle Database 12c Enterprise Edition Release 12.1.0.2.0 - 64bit Production
With the Partitioning, OLAP, Advanced Analytics and Real Application Testing options

SQL> select version from v$instance;

VERSION
-----------------
12.1.0.2.0
Do you want to learn Oracle Database for Beginners, then read the following articles.
https://ittutorial.org/oracle-database-19c-tutorials-for-beginners/